Ensure that your token is stored as a secret in your repository (SONARCLOUD_TOKEN in this example project). You can request new tokens using Account/Security page.
A build of the code repository on a macOS platform using CMake build system.
To build the code run:
mkdir build && cd build
cmake ..
make
Code Description
An example of a flawed C++ code. The code repository can be analyzed automatically, but it can also be compiled with different build systems using different CI pipelines on Linux, macOS, and Windows.
Note: You will need NodeJS to build the extension package.
The jlpm command is JupyterLab’s pinned version of
yarn that is installed with JupyterLab. You may use
yarn or npm in lieu of jlpm below.
# Clone the repo to your local environment# Change directory to the seoul256_jupyterlab_theme directory# Install package in development mode
pip install -e "."# Link your development version of the extension with JupyterLab
jupyter labextension develop . --overwrite
# Rebuild extension Typescript source after making changes
jlpm build
You can watch the source directory and run JupyterLab at the same time in different terminals to watch for changes in the extension’s source and automatically rebuild the extension.
# Watch the source directory in one terminal, automatically rebuilding when needed
jlpm watch
# Run JupyterLab in another terminal
jupyter lab
With the watch command running, every saved change will immediately be built locally and available in your running JupyterLab. Refresh JupyterLab to load the change in your browser (you may need to wait several seconds for the extension to be rebuilt).
By default, the jlpm build command generates the source maps for this extension to make it easier to debug using the browser dev tools. To also generate source maps for the JupyterLab core extensions, you can run the following command:
jupyter lab build --minimize=False
Development uninstall
pip uninstall seoul256_jupyterlab_theme
In development mode, you will also need to remove the symlink created by jupyter labextension develop
command. To find its location, you can run jupyter labextension list to figure out where the labextensions
folder is located. Then you can remove the symlink named seoul256-jupyterlab-theme within that folder.
An Information Theory Framework for Movement Path Segmentation and Analysis
Varun Sethi
(as a member of Getz Lab)
University of California at Berkeley
Overview
This repository corresponds to [1], where we present an information theoretic framework for hierarchical segmentation of animal movement trajectory to construct behavioural activity modes (BAMs) – e.g., foraging, resting, travelling, et cetera. Here, I give a brief, but more verbose, presentation of the data science problem in this work. Essentially, it involves a bottom-up procedure to construct canonical activity modes (CAMs) starting from a relocation data track, and encoding these raw CAMs using statistical movement elements (StaMEs) pre-extracted from the track.
CAM coding with StaMEs as a data science problem
The algorithm for construction of StaMEs from movement track data was explored for the first time in [2] and is reviewed in [1]. The relocation series
such that each segment has $\mu$ points. The segmentation can be performed in two ways: to generate a vector (or feature) representation using means, standard deviations, and net displacement[2]; and as multivariate time-series of $\mu$ points. These segments are then categorised using a clustering algorithm into $n$ clusters. The cluster centroid, which is a representative segment for a cluster (e.g., mean of all segments belonging to that cluster), is called a StaME:
$\raise{1cm} { \rm{which \ essentially \ assigns \ a \ StaME \ to \ each \ base \ segment.} }$
On similar lines, the relocation sequence ${\mathcal T}^{\rm loc }$ is segmented into ‘word’ time series ${\mathcal T}^{\rm wd}$, each segment having $m\mu$ elements. Given our relocation frequency of $\frac{1}{4}Hz$ (i.e., a triangulation every $4\sec$), this segmentation is at a resolution of $5m\mu\sec$; this is a coarser resolution than before, hence the terminology ‘base’ segment. It should also be noted that in the absence of fundamental movement elements (FuMEs, which are mechanical movements like slithering, galloping, flapping wings, etc., and cannot be identified with relocation data alone), we use StaMEs as the most basic building block for hierarchical approach to path segmentation [2]. The word segments are then classified into $k$ clusters (termed CAMs), each having $N^{\rm wd}_c$ words ($c=1,\cdots,k$). This helps us assign each word to a CAM (called `raw’ CAM assignment) using cluster centroids.
Next, we want to explore CAM construction through StaMEs. Note that a word segment is created out of $m$ base segments. Because of this construction, a word can be coded as a string of $m$ StaMEs (which are base segment clusters). As an example, consider a scenario where $\mu=5$, $n=4$, and $m=3$; then the base segment is $5-$points long and a word is $15-$points long. In this case, if the $3$ base segments constituting a word form the StaMEs $3,\ 1,\ 1$, then the word is coded as $311$. We call this CAM coding with StaMEs as the bases. It is obvious that multiple words could have the same coding. It’s easy to calculate the total number of word types: $n^m=64$; these word types are labelled using a sorting algorithm as explained in Appendix C of [1]. From here on, we calculate their distribution as the count of each word type by raw CAM. Next, a word type is identified as belonging to a CAM according to which raw CAM it occurs in the most frequently. The misassigned words of this type are then assigned to the correct CAM, thereby rectifying it. The corresponding error can be calculated using the proportion of misassigned words.
We define a coding scheme as a combination of clustering algorithms to generate StaMEs and CAMs, along with other parameters – $\mu$ (base segment size), $n$ (number of StaMEs), $m$ (number of base segments in a word), $k$ (number of CAMs). We use several metrics, including the error associated with the misassignment of words in CAMs, to compare the coding schemes. A coding efficiency at the level of StaME, CAM, and rectified CAM sequences is defined using the Shannon information entropy. The coding efficacy of track segmentation into raw CAMs is measured by Jensen-Shannon divergence, which compares the word distributions before and after CAM clustering. Lastly, I consider various vector and shape clustering algorithms in our coding schemes as described next.
Clustering approaches
The algorithms I use for clustering our time-series data can be classified as feature-based and shape-based. In feature-based (also termed vector clustering) approaches, a feature vector representation is contructed from the multivariate (speed and turning angle) time-series (base segments or words as explained above). This representation has statistical summary variables (means, standard deviations) and net displacement as in [1]. I use the following vector clustering approaches.
Hierarchical agglomerative clustering with Ward’s criterion and Euclidean metric used to compute the pairwise dissimilarity matrix (E). I implement this in $\texttt{R-4.3.2} $ using same methods as in [2].
Clustering is performed on the data transformed into similarity space as follows. Graph spectral clustering (S) first constructs a similarity graph from the data using the affinity matrix: a matrix of point-to-point similarities $A_{ij} = exp(-\frac{||x_i-x_j||^2}{2 \sigma^2})$ (Gaussian kernel with Euclidean metric), where points form the nodes while edges quantify the similarity between the points. Clusters are then found using k-means method in the reduced dimensional representation extracted from the spectral analysis of the normalized graph Laplacian $L = \mathbb{1} – D^{-1/2}AD^{-1/2}$, where diagonal node degree matrix $D_{ii} = \sum_{j=1}^nA_{ij}$. Summarily, it’s a $k$-way graph cut problem—the connections between the points with low similarity are severed, while the net weight of the edges between the clusters are minimized. The computational complexity of the algorithm is ${\mathcal O}(N_{seg}^3)$. I implement this method in $\texttt{Python 3.10.10}$ using a Gaussian radial base function (RBF) kernel.
Random Forest classifier can be used in an unsupervised way to generate a proximity matrix. The algorithm creates a synthetic dataset with each variable randomly sampled from the univariate distribution of the corresponding variable of the original dataset. The original and new datasets are given class labels $1$ and $2$, and merged to be used for training the random forest. The proximity matrix, constructed in terms of how often two points end up in the same leaf nodes, is then used for hierarchical clustering with Ward’s criterion. We call this algorithm ‘F’. Here, I perform distributed execution of the algorithm through using a parallel backend. Essentially, the task is split into multiple cores with each handling a number of trees.
Shape-based clustering approaches are directly applied to the time-series representation of the segments. I use hierarchical agglomerative clustering with Ward’s criterion, and the following two algorithms for computing pairwise dissimilarity (called ‘D’, ‘M’) between our segments.
Dynamic Time Warping (DTW) is a temporal shift-invariant similarity measure that performs one-to-one and one-to-many maps (or temporal alignments) between two time-series to minimize the Euclidean distance between aligned series. The algorithm constructs a local cost matrix (LCM) employing an ${\rm L}_p$-norm ($p \in \{1,2\}$) between each pair of points in the two time-sequences (lengths $m,~n$), with the ${ij}^{\rm th}$ element given by $ D(i,j) = d(i,j) + min\{ d(i-1,j);d(i,j-1),d(i-1,j-1) \}$. Finding an optimal warp path then amounts to minimizing the cost over all admissible paths from ${\rm LCM}(1,1)$ to ${\rm LCM}(n,m)$ while ensuring that the sequence of index pairs increases monotonically in both $i$ and $j$. I use the $\texttt{R}$$\texttt{dtw\_basic}$ function to help manage the ${\mathcal O}(N_{seg}^2)$ computational complexity with its C++ core and memory optimizations.
I use the slanted band window constraint, which ensures that the warping path remains close to the diagonal. The $\texttt{stepPattern}$ employed to traverse through the LCM is $\texttt{R}$$\texttt{symmetric2}$, which is commonly used and makes the DTW computation symmetric. The choice of clustering solution selected for different choices of window size within the range ${1,\ldots,4}$ and value of $p=1$ or 2 in $L_p$-norm is governed by silhouette coefficient.
DTW cost is a non-differentiable function, which limits its utility when used as a loss function. Soft-DTW is a differentiable alternative to DTW making use of a soft-min operator.
Data repository and description of scripts
The methods developed here have been demonstrated on both simulated and empirical relocation data. The former has been generated using a two‐mode step‐selection kernel simulator called Numerus ANIMOVER_1 [2]. The empirical data is obtained using an ATLAS reverse GPS technology system at a relocation frequency of 0.25 Hz. It corresponds to a female barn owl (Tyto alba) individual, which is part of a population tagged at our study site in the Harod Valley in northeast Israel. The ANIMOV and owl datasets are available in my Dryad repository as files multi-DAR_sim.csv and list-DARsAsDataframes_owl.Rds respectively.
Codes for preparation and clustering of base and word segment data for a barn owl individual and ANIMOV1 are under the clustering directory. The directory raw-CAM-coding shows the programs to label the word types, calculate their counts by raw CAMs, evaluate the Jensen-Shannon divergence to measure the entropy loss by word clustering, and identifies a coarse resolution segment corresponding to every word. The codes for calculating rectified CAM statistics, StaMEs’ distribution in rectified CAMs, and efficiency and error metrics to compare the coding schemes are presented in the directory rectification-of-CAMs. Each script is preceeded by a serial number, and might require one or more of the earlier scripts to be executed beforehand.
Results
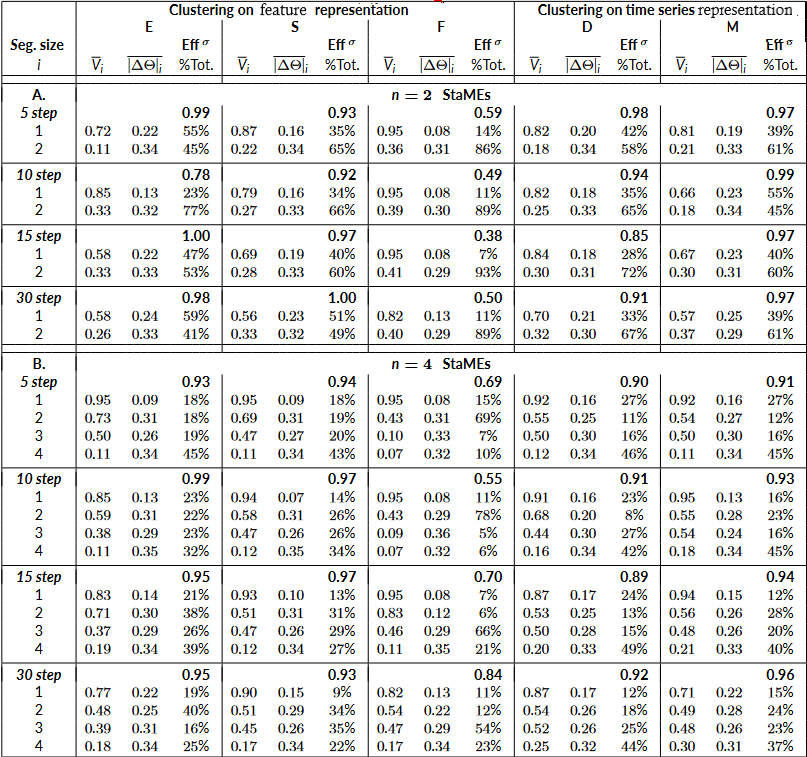
Table: Comparison of various feature-based (or vector) and shape-based clustering approaches for the 2-mode simulated data. Shown are 3 parameters – mean speed, mean turning angle, and occupancy – for each base segment cluster (StaME), along with the efficiency of each clustering method.
Figure: Word-type distributions for each word cluster (CAM) with 4 StaMEs (base segment clusters) and m=3 (i.e., 3 base segments constituting a word) obtained using different coding schemes for the case of simulated data. Rectified CAM assignment for each word type is denoted by filled bars. CAMs are ordered in decreasing order of speed with red signifying the fastest CAM.
Creative Commons Legal Code

CC0 1.0 Universal

    CREATIVE COMMONS CORPORATION IS NOT A LAW FIRM AND DOES NOT PROVIDE
    LEGAL SERVICES. DISTRIBUTION OF THIS DOCUMENT DOES NOT CREATE AN
    ATTORNEY-CLIENT RELATIONSHIP. CREATIVE COMMONS PROVIDES THIS
    INFORMATION ON AN "AS-IS" BASIS. CREATIVE COMMONS MAKES NO WARRANTIES
    REGARDING THE USE OF THIS DOCUMENT OR THE INFORMATION OR WORKS
    PROVIDED HEREUNDER, AND DISCLAIMS LIABILITY FOR DAMAGES RESULTING FROM
    THE USE OF THIS DOCUMENT OR THE INFORMATION OR WORKS PROVIDED
    HEREUNDER.

Statement of Purpose

The laws of most jurisdictions throughout the world automatically confer
exclusive Copyright and Related Rights (defined below) upon the creator
and subsequent owner(s) (each and all, an "owner") of an original work of
authorship and/or a database (each, a "Work").

Certain owners wish to permanently relinquish those rights to a Work for
the purpose of contributing to a commons of creative, cultural and
scientific works ("Commons") that the public can reliably and without fear
of later claims of infringement build upon, modify, incorporate in other
works, reuse and redistribute as freely as possible in any form whatsoever
and for any purposes, including without limitation commercial purposes.
These owners may contribute to the Commons to promote the ideal of a free
culture and the further production of creative, cultural and scientific
works, or to gain reputation or greater distribution for their Work in
part through the use and efforts of others.

For these and/or other purposes and motivations, and without any
expectation of additional consideration or compensation, the person
associating CC0 with a Work (the "Affirmer"), to the extent that he or she
is an owner of Copyright and Related Rights in the Work, voluntarily
elects to apply CC0 to the Work and publicly distribute the Work under its
terms, with knowledge of his or her Copyright and Related Rights in the
Work and the meaning and intended legal effect of CC0 on those rights.

1. Copyright and Related Rights. A Work made available under CC0 may be
protected by copyright and related or neighboring rights ("Copyright and
Related Rights"). Copyright and Related Rights include, but are not
limited to, the following:

  i. the right to reproduce, adapt, distribute, perform, display,
     communicate, and translate a Work;
 ii. moral rights retained by the original author(s) and/or performer(s);
iii. publicity and privacy rights pertaining to a person's image or
     likeness depicted in a Work;
 iv. rights protecting against unfair competition in regards to a Work,
     subject to the limitations in paragraph 4(a), below;
  v. rights protecting the extraction, dissemination, use and reuse of data
     in a Work;
 vi. database rights (such as those arising under Directive 96/9/EC of the
     European Parliament and of the Council of 11 March 1996 on the legal
     protection of databases, and under any national implementation
     thereof, including any amended or successor version of such
     directive); and
vii. other similar, equivalent or corresponding rights throughout the
     world based on applicable law or treaty, and any national
     implementations thereof.

2. Waiver. To the greatest extent permitted by, but not in contravention
of, applicable law, Affirmer hereby overtly, fully, permanently,
irrevocably and unconditionally waives, abandons, and surrenders all of
Affirmer's Copyright and Related Rights and associated claims and causes
of action, whether now known or unknown (including existing as well as
future claims and causes of action), in the Work (i) in all territories
worldwide, (ii) for the maximum duration provided by applicable law or
treaty (including future time extensions), (iii) in any current or future
medium and for any number of copies, and (iv) for any purpose whatsoever,
including without limitation commercial, advertising or promotional
purposes (the "Waiver"). Affirmer makes the Waiver for the benefit of each
member of the public at large and to the detriment of Affirmer's heirs and
successors, fully intending that such Waiver shall not be subject to
revocation, rescission, cancellation, termination, or any other legal or
equitable action to disrupt the quiet enjoyment of the Work by the public
as contemplated by Affirmer's express Statement of Purpose.

3. Public License Fallback. Should any part of the Waiver for any reason
be judged legally invalid or ineffective under applicable law, then the
Waiver shall be preserved to the maximum extent permitted taking into
account Affirmer's express Statement of Purpose. In addition, to the
extent the Waiver is so judged Affirmer hereby grants to each affected
person a royalty-free, non transferable, non sublicensable, non exclusive,
irrevocable and unconditional license to exercise Affirmer's Copyright and
Related Rights in the Work (i) in all territories worldwide, (ii) for the
maximum duration provided by applicable law or treaty (including future
time extensions), (iii) in any current or future medium and for any number
of copies, and (iv) for any purpose whatsoever, including without
limitation commercial, advertising or promotional purposes (the
"License"). The License shall be deemed effective as of the date CC0 was
applied by Affirmer to the Work. Should any part of the License for any
reason be judged legally invalid or ineffective under applicable law, such
partial invalidity or ineffectiveness shall not invalidate the remainder
of the License, and in such case Affirmer hereby affirms that he or she
will not (i) exercise any of his or her remaining Copyright and Related
Rights in the Work or (ii) assert any associated claims and causes of
action with respect to the Work, in either case contrary to Affirmer's
express Statement of Purpose.

4. Limitations and Disclaimers.

 a. No trademark or patent rights held by Affirmer are waived, abandoned,
    surrendered, licensed or otherwise affected by this document.
 b. Affirmer offers the Work as-is and makes no representations or
    warranties of any kind concerning the Work, express, implied,
    statutory or otherwise, including without limitation warranties of
    title, merchantability, fitness for a particular purpose, non
    infringement, or the absence of latent or other defects, accuracy, or
    the present or absence of errors, whether or not discoverable, all to
    the greatest extent permissible under applicable law.
 c. Affirmer disclaims responsibility for clearing rights of other persons
    that may apply to the Work or any use thereof, including without
    limitation any person's Copyright and Related Rights in the Work.
    Further, Affirmer disclaims responsibility for obtaining any necessary
    consents, permissions or other rights required for any use of the
    Work.
 d. Affirmer understands and acknowledges that Creative Commons is not a
    party to this document and has no duty or obligation with respect to
    this CC0 or use of the Work.
classPeopleController < ApplicationControllerdefcreate@person=Person.create!(person_params)endprivatedefperson_params# The name is automatically inferred by the controller namesanitize_params!# Or you can instantiate a custom one# You can pass the current user or nil# CustomPersonParamsSanitizer.new(current_user).sanitize(params)endend
param! vs params! vs group! vs array!
Paramoid is based on Rails Strong Parameters and it’s inheriting its behaviour.
param! is used to permit a single scalar parameter. param! :name is equivalent of params.permit(:name, ...)
params! is just a shortcut to sanitize in mass a list of parameters having the same options
group! is used to sanitize objects or arrays, like params.permit(my_key: [:list, :of, :keys])
array! is an alias of group! and it’s added for readability: in Strong Parameters, params.permit(name: [:some_key]) accepts both a single object or an array of objects, and this is preserved here.
Declaring a parameter as required, will raise a ActionController::ParameterMissing error if that parameter is not passed by to the controller. This also works with nested structures.
Jika Anda menggunakan browser Chrome, ketuk titik tiga di sudut kanan atas untuk opsi “Terjemahkan…”
Vikaru-Md | WhatsApp Bot Multidevice
# Vikaru-Md | ( Installation )
Starting from v2.3.0 and above, installation and environment setup are now handled automatically through the ( Vikaru-Installer ) repository.
# Vikaru-Md | ( Start )
After installation via the Vikaru-Installer, simply run:
• [1] Start Bot
Enter your WhatsApp number in international format ( e.g., +62 895-0889-9033 ).
Then, copy and link the pairing code to your WhatsApp application.
Once the connection is successful, the bot will be ready for use.
Try sending a simple command:
/menu
# Vikaru-Md | ( Features )
CLI Menu
Manage sessions in real time while Node.js is running — just press “Enter” to open.
[1] Stop: Stop all running sessions.
[2] Add: Add a new WhatsApp session.
[3] Run: Start a saved session from the session list.
Vikaru-Md Bot Core
Vikaru-Md is a multi-device WhatsApp bot designed for automation, AI integration, group moderation, and business support — with a clean, extensible, and developer-friendly architecture.
• [ Core Highlights ]
Pairing Code & QR Code login
Custom Pairing ID
CLI Interactive Menu
Whitelist system for index.js
Clean & readable codebase
Multi-prefix support
Multi-session (run multiple bots simultaneously)
Interactive interface/log viewer
Anti Call / Anti Spam / Anti Link / Anti Virtex
Group event responses (welcome, leave, promote, demote)
Asciidoctor FB2 is an Asciidoctor extension for converting AsciiDoc documents directly to the FB2 e-book format.
Installation
Asciidoctor FB2 is published on RubyGems.org.
You can install the published gem using the following command:
$ gem install asciidoctor-fb2
Assuming all the required gems install properly, verify you can run the asciidoctor-fb2 script:
$ asciidoctor-fb2 -v
If you see the version of Asciidoctor FB2 printed, you’re ready to use Asciidoctor FB2.
Usage
Converting an AsciiDoc document to FB2 is as simple as passing your document to the asciidoctor-fb2 command.
This command should be available on your PATH if you installed the asciidoctor-fb2 gem.
Otherwise, you can find the command in the bin folder of the project.
We also recommend specifying an output directory using the -D option flag.
$ asciidoctor-fb2 -D output path/to/book.adoc
When the script completes, you’ll see the file book.fb2.zip appear in the output directory.
Open that file with an FB2 reader to view the result.
FB2-related AsciiDoc Attributes
The metadata in the generated FB2 file is populated from attributes in the AsciiDoc document.
The names of the attributes and the metadata elements to which they map are documented in this section.
Table 1. AsciiDoc attributes that control the FB2 metadata
Name
Description
uuid
Populates unique book identifier in FB2 metadata.
lang
Populates the content language in FB2 metadata.
keywords
Populates keywords list in FB2 metadata.
The keywords should be represented as comma-separated values (CSV).
genres
Populates genres list in FB2 metadata.
The genres should be represented as comma-separated values (CSV).
front-cover-image
Specifies path to front cover image.
Development
After checking out the repo, run bundle install to install dependencies.
Then, run bundle exec rake spec to run the tests.
MDX Preview lets you preview MDX seamlessly. Write markdown / JSX, see it live refresh and get instant visual feedback.
Features
Instant preview as you type without starting a dev server or building
To get started:
Run yarn install or npm install if necessary so that you have the npm dependencies in your workspace, and navigate to your md or mdx file; or just create an untitled file, change language mode (from command palette) to mdx and type some mdx code.
Open command palette, and type “MDX: Open Preview”; or click the magnifying glass.
Preview will automatically update when you change the file you are previewing or the files that currently previewed file depends on.
MDX Extension is recommended for syntax highlighting of MDX files.
Custom Layout
You can apply custom layout to the MDX file by
Exporting a default layout value using export default
Specifying a path to a custom layout config file in mdx-preview.preview.mdx.customLayoutFilePath extension setting. For example, the absolute path to the ../components/Layout file above.
When nothing is specified, by default it will apply VS Code Markdown styles. You can turn that off by mdx-preview.preview.useVscodeMarkdownStyles extension settings or “MDX: Toggle VSCode Markdown Styles” command.
MDX transclusion
You can import other files with .md or .mdx extension.
If you have a JavaScript or TypeScript file that renders to the #root element, you can also preview that using MDX Preview. For example, you can preview the index.js file from your react app:
Code will only be evaluated inside VS Code extension webview’s isolated iframe. The MDX files can only require dependencies within your active workspace folders. By default, only HTTPS content is allowed within the webview. Of course, you still need to make sure you trust the MDX file you preview, AND trust the files inside your workspace. Note that with the default Content Security Policy, you would not be able to preview a LiveEditor.
You can change your security settings through mdx-preview.preview.security extension setting or “MDX: Change Security Settings” command.
Extension Settings
This extension contributes the following settings:
mdx-preview.preview.previewOnChange: If set to true, previews on file change; If set to false, previews on file save
mdx-preview.preview.useVscodeMarkdownStyles: Use VS Code Markdown Styles for layout.
mdx-preview.preview.useWhiteBackground: Use white background regardless of current theme settings.
mdx-preview.preview.mdx.customLayoutFilePath: Path of custom layout file to use
mdx-preview.build.useSucraseTranspiler: Use sucrase as transpiler (A faster alternative to babel) instead of Babel/TypeScript transpiler
FAQ
How it works
MDX Preview transpiles your .mdx file using @mdx-js/mdx, sends the initial file to the webview, and recursively fetches local dependencies (from your workspace) and npm dependencies (from node_modules directory) from your workspace using polestar, a commonjs-ish module loader for browsers. MDX Preview has provided built-in dependencies for MDX rendering like react, react-dom and @mdx-js/tag.
Some components doesn’t work?
In most cases runtime errors will surface in react-error-overlay. If it doesn’t, you can open “Developer: Open Webview Developer Tools” (from command palette) to inspect the error. Note that VS Code webview has some inherent limitations that might cause errors. For example, components that use local storage but without a try/catch block.
Build issues? Try checking mdx-preview.build.useSucraseTranspiler extension setting. It might solve it.
Road map
TypeScript support
Scroll Sync
remark/rehype plugins
Integrations with gatsby / x0 /…
Acknowledgements
This extension is not possible without the help from James and the open source polestar library.
Saying thanks to these awesome open source projects as well:
Codesandbox preview for Atom for the idea of recursively resolving dependencies in the workspace and presenting in a preview.
My name is Felipe Fernandes Secato and I am a Bachaelor of Information Systems at UFES (Federal University of Espírito Santo).
This repository has all the files and results of my bachelor dissertation.
Title
Application of Augmented Reality without markers for visualization of online products through a mobile application.
Abstract
Augmented reality is a technology that has gained a lot of space in recent years primarily because of the popularity and ease of access of mobile devices, but the most common use of augmented reality is still very restricted to marketing and games. This work aimed to evaluate the use of augmented reality without markers as an alternative in the visualization of products of a virtual store, a mobile application capable of obtaining a 3D model of the Internet and making use of augmented reality without markers with the SLAM tracking technique, allowing the application to work in any environment without the need for prior knowledge of the site. The validation of the application was made through a qualitative questionnaire, where it was analyzed questions such as ease of use, main problems found and usefulness of the application. Augmented reality without the use of markers has proven to be a viable alternative for viewing online products, enabling the user to preview the product in their own environment before purchasing it.
Main Technologies
Unity 3D
Kudan AR SDK (SLAM tracking technique)
Repository
- app                  -> unity project
- loja                 -> support site
- felipesecato_tcc.pdf -> full work (only portuguese)
Steps to test the application
Requirements:
– Android 4.4.2 or above
– Internet access
1 – Download the app from play store.
2 – Access the virtual store created for this work, this store offers the 3D models of the products.
3 – With the application open, click the scan button and scan the barcode of the product you want to see in your environment.
4 – Click the RA button, choose the height between your mobile device and the floor and click the middle button (eye icon), the 3D object will be positioned in place of the red marker.
Questions
For questions and information regarding the work contact me at the email contact@felipesecato.com
Português
Bem-vindo
Meu nome é Felipe Fernandes Secato e sou Bacharel de Sistemas de Informação pela UFES (Universidade Federal do Espírito Santo).
Este repositório conta com todos os arquivos e resultados do meu Trabalho de Conclusão de Curso, a seguir mais informações do mesmo:
Título
Aplicação de realidade aumentada sem marcadores para a visualização de produtos online através de uma aplicação móvel.
Resumo
A realidade aumentada é uma tecnologia que tem ganhado muito espaço nos últimos anos principalmente por conta da popularidade e facilidade de acesso dos dispositivos móveis, mas o uso mais comum da realidade aumentada ainda é muito restrito a ações de marketing e jogos. Este trabalho teve como objetivo avaliar o uso da realidade aumentada sem marcadores como alternativa na visualização de produtos de uma loja virtual, sendo desenvolvido uma aplicação móvel capaz de obter um modelo 3D da Internet e que faz uso da realidade aumentada sem marcadores com a técnica de rastreio SLAM, permitindo assim que o aplicativo funcionasse em qualquer ambiente sem a necessidade de um conhecimento prévio do local. A validação da aplicação foi feita por meio de questionário qualitativo, onde foi analisado questões como facilidade de uso, principais problemas encontrados e utilidade da aplicação. A realidade aumentada sem uso de marcadores se mostrou uma alternativa viável para visualização de produtos online, possibilitando que o usuário visualize o produto préviamente em seus próprio ambiente, antes mesmo de realizar a compra.
Principais Tecnologias utilizadas
Unity 3D
Kudan AR SDK (rastreio com a técnica SLAM)
Organização do repositório
- app                   -> projeto da aplicação móvel
- loja                  -> loja virtual de apoio
- felipesecato_tcc.pdf  -> trabalho completo
Passos para testar a aplicação
Requisitos:
– Android 4.4.2 ou acima
– Internet
1 – Baixe a aplicação disponível na google play no link a seguir.
2 – Acesse a loja virtual criada para este trabalho, essa loja disponibiliza os modelos 3D dos produtos.
3 – Com a aplicação aberta, clique no botão scan e escanei o código de barras do produto que deseja visualizar no seu ambiente.
4 – Clique no botão RA, escolha a altura entre o seu dispositivo móvel e o chão e clique no botão do meio (ícone de olho), o objeto 3D será posicionado no lugar do marcador vermelho.
Dúvidas
Para dúvidas e informações a respeito do trabalho entre em contato através do e-mail contact@felipesecato.com