Install git on your Pi via sudo apt-get install git and clone this repo.
Set your preferrences (see below).
Build your docker image for caddy
cd into docker/ and run docker-compose -f webpi.yaml up -d
If everything works you should see “Hello World” via http://192.168.0.XX (the IP for your Pi). Manage your database via Adminer on 192.168.0.XX:2015.
Default Ports
Service
Port
Caddy
80
MariaDB
3306
Adminer
2015
Preferences
Make sure to change the following settings:
Service
Folder
Contents
docker-compose file
docker/webpi.yaml
Set the name for your caddy image under web: … image:
docker-compose file
docker/webpi.yaml
Change your MY_SQL settings under environment
index.php
caddy/www/index.php
Set values for accessing MariaDB via PHP
Caddy
The Caddyfile will be taken from docker/caddy/ and mounted into /etc/Caddyfile inside the container. www/ will be mounted into /srv/www/
MariaDB
A fresh instance of MariaDB will be mounted into /var/lib/mysql/ inside the container. If you have any existing databases, just move them into mariadb/db before you run docker-compose !
ds_nms библиотека для аналитики данных и машинного обучения, включающая модули для предобработки данных, отбора признаков, обучения моделей, тюнинга гиперпараметров и проведения статистического анализа. Она позволяет автоматизировать ключевые этапы работы с данными и моделями машинного обучения, обеспечивая эффективные инструменты для анализа и оптимизации.
df_target_encoding: Выполняет целевое кодирование категориальных признаков с использованием TargetEncoder
Модуль feature_select
Предназначен для отбора значимых признаков в наборах данных
get_selected_features: Выполняет отбор признаков с использованием RFE или SFS, возвращая новый набор данных с выбранными переменными.
get_best_n_features: Оптимизирует количество признаков с помощью Optuna, проводя кросс-валидацию и выбирая наилучший набор переменных.
save_selected_features: Выполняет отбор признаков для нескольких датасетов и моделей, сохраняя результаты
Модуль model_train
Предназначен для обучения моделей машинного обучения, оценки их качества и анализа важности признаков.
get_feature_importance_df: Возвращает таблицу важности признаков для обученной модели
get_importances_barplot: Строит график важности признаков, используя коэффициенты модели и SHAP-значения.
get_feat_importance_arima: Анализирует важность признаков в модели SARIMAX
get_feature_contrib: Анализирует вклад признаков в предсказания линейных моделей
plot_ts_pred: Строит график предсказанных и фактических значений для временных рядов.
get_prediction: Возвращает датафрейм с метриками качества модели и массив предсказаний.
train_cv: Обучает модель с использованием различных схем кросс-валидации (KFold, LeaveOneOut, StratifiedKFold, TimeSeriesSplit)
arima_train: Автоматический подбор параметров и обучение SARIMAX модели для временных рядов.
arima_predict: Выполняет предсказание временного ряда с использованием обученной модели SARIMAX.
Модуль model_tune
Предназначен для оптимизации гиперпараметров моделей машинного обучения с использованием Optuna.
get_optimize_params: Выполняет подбор оптимальных гиперпараметров модели с использованием Optuna.
get_optimize_results: Запускает полный процесс оптимизации и последующего обучения модели с лучшими параметрами. Возвращает обученную модель, метрики и предсказания.
get_optimize_several_results: Оптимизирует несколько моделей на различных датасетах, сохраняя результаты.
get_best_study_params: Определяет лучшие гиперпараметры, отфильтровывая результаты по заданным критериям
optuna_plot: Визуализирует Pareto-графики, важность параметров и зависимость метрик от гиперпараметров.
mlflow_save_results: Логирует метрики и обученные модели в MLflow
get_prediction_df: Создает итоговый датафрейм с предсказаниями и ошибками модели
Модуль model_tune_params
Предназначен для управления гиперпараметрами моделей, используемых в процессе обучения и оптимизации. Служит справочником параметров, которые можно изменять и передавать в model_tune для автоматической оптимизации.
Класс ModelsParams: Хранит параметры моделей для оптимизации, включая диапазоны значений и базовые параметры. Поддерживаемые модели:
K-Nearest Neighbors (KNN)
Lasso, Ridge, ElasticNet
Huber Regressor
Stochastic Gradient Descent (SGD)
Support Vector Regressor (SVR)
Decision Trees (DT)
Random Forest (RF)
Extra Trees (EXTR)
XGBoost (XGB)
LightGBM (LGBM)
Stacking Regressor
Bayesian Ridge
Tweedie Regressor
Theil-Sen Regressor
ARD Regression
Passive Aggressive Regressor (PAR)
set_param: Позволяет изменять параметры модели перед их передачей в model_tune
Модуль stat_tests
Предназначен для проведения статистических тестов и анализа данных.
plot_test_hists: Строит гистограммы для двух выборок, позволяя визуально сравнить их распределения.
kolmog_smirn_test: Тест Колмогорова-Смирнова – проверяет, принадлежат ли две выборки одному распределению.
kraskel_wallis_test: Тест Краскела-Уоллиса – анализирует статистически значимые различия между независимыми выборками.
adfuller_test: Тест Дики-Фуллера (ADF) – проверяет временной ряд на стационарность.
kpss_test: KPSS-тест – альтернатива ADF для проверки стационарности временного ряда.
stationarity_test: Объединяет результаты ADF и KPSS, предоставляя комплексную оценку стационарности.
acf_pacf_plot: Строит автокорреляционную функцию (ACF) и частичную автокорреляционную функцию (PACF).
Модуль utils_io
Предназначен для работы с файлами и данными, включая сохранение и загрузку файлов в различных форматах (pickle, json), управление сервером MLflow, а также очистку логов в PostgreSQL.
save_data: Сохраняет данные (словарь с объектами) в указанную директорию в форматах pkl или json.
load_data: Загружает данные из указанной директории в форматах pkl или json.
mlflow_server_start: Запускает сервер MLflow для логирования экспериментов
mlflow_run_delete: Удаляет логи MLflow из базы данных PostgreSQL
data_proc_test.ipynb: Тестирование функций предобработки данных, включая обнаружение выбросов, масштабирование, кодирование категориальных признаков и анализ корреляции.
data_proc
stat_tests
utils_io
data_ts_test.ipynb: Анализ и обработка временных рядов, включая разложение сезонности, обучение моделей и оценку качества прогнозирования
model_train
feature_contribution.ipynb: Анализ вклада признаков в предсказания моделей с использованием методов интерпретируемости, таких как коэффициенты линейных моделей и SHAP-значения.
‘Who’s That Champion? – URF Version’ is an interactive game and web application designed for the first Riot Games API Challenge.
The app was chosen as a winning submission placing as a runner-up.
The rules are simple:
Analyze the match details that are given to you.
Guess which champion the data is from (based soley on analysis, problem solving, and guesstimations).
See how many you can get right in a row, and brag to your friends!
We have collected data from over 85,000 URF mode games, so you’re sure to get a unique match every time you play.
Demo
A demo for this project is no longer available.
Version
1.1.1
Tech
“Who’s That Champion?” was developed with the following tech stack:
A matchId daemon was created to fetch matchIds every time a new batch was available. It ran as a long running process until URF mode was
made unavailable. Each matchId from a batch was stored as a document in a matchIds collection in the database.
A match details daemon was created to retrieve the match details of every matchId found in the database via the Riot Games API. The necessary match
data needed for the web app was parsed from the data returned from the Riot Games API and made into a document. This document was then stored in the
matches collection in the database.
A static data script was created and run one time. The script retrieved static data for champions, spells, and items via the Riot API.
The necessary data for the web app was parsed and made into a document, which was then stored in the database to their respective collections. Namely, the champions, items, and spells collections of the database.
Now that URF is over, none of these scripts need to be run, as all data is up to date in relation to the stored matches.
Contributions
This project is now open source now that the API Challenge is over.
If you would like to contribute to this project please open an issue, or send a pull request.
🌟 MMPreTrain is a newly upgraded open-source framework for visual pre-training. It has set out to provide multiple powerful pre-trained backbones and support different pre-training strategies.
MMSelfSup is an open source self-supervised representation learning toolbox based on PyTorch. It is a part of the OpenMMLab project.
The master branch works with PyTorch 1.8 or higher.
Major features
Methods All in One
MMSelfsup provides state-of-the-art methods in self-supervised learning. For comprehensive comparison in all benchmarks, most of the pre-training methods are under the same setting.
Modular Design
MMSelfSup follows a similar code architecture of OpenMMLab projects with modular design, which is flexible and convenient for users to build their own algorithms.
Standardized Benchmarks
MMSelfSup standardizes the benchmarks including logistic regression, SVM / Low-shot SVM from linearly probed features, semi-supervised classification, object detection and semantic segmentation.
Compatibility
Since MMSelfSup adopts similar design of modulars and interfaces as those in other OpenMMLab projects, it supports smooth evaluation on downstream tasks with other OpenMMLab projects like object detection and segmentation.
What’s New
MMSelfSup v1.0.0 was released based on main branch. Please refer to Migration Guide for more details.
MMSelfSup v1.0.0 was released in 06/04/2023.
Support PixMIM.
Support DINO in projects/dino/.
Refactor file io interface.
Refine documentations.
MMSelfSup v1.0.0rc6 was released in 10/02/2023.
Support MaskFeat with video dataset in projects/maskfeat_video/
Translate documentation to Chinese.
MMSelfSup v1.0.0rc5 was released in 30/12/2022.
Support BEiT v2, MixMIM, EVA.
Support ShapeBias for model analysis
Add Solution of FGIA ACCV 2022 (1st Place)
Refactor t-SNE
Please refer to Changelog for details and release history.
Differences between MMSelfSup 1.x and 0.x can be found in Migration.
We appreciate all contributions improving MMSelfSup. Please refer to Contribution Guides for more details about the contributing guideline.
Acknowledgement
MMSelfSup is an open source project that is contributed by researchers and engineers from various colleges and companies. We appreciate all the contributors who implement their methods or add new features, as well as users who give valuable feedbacks.
We wish that the toolbox and benchmark could serve the growing research community by providing a flexible toolkit to reimplement existing methods and develop their own new algorithms.
MMSelfSup originates from OpenSelfSup, and we appreciate all early contributions made to OpenSelfSup. A few contributors are listed here: Xiaohang Zhan (@XiaohangZhan), Jiahao Xie (@Jiahao000), Enze Xie (@xieenze), Xiangxiang Chu (@cxxgtxy), Zijian He (@scnuhealthy).
Citation
If you use this toolbox or benchmark in your research, please cite this project.
This project is an example implementation of the Open Microservice Specification, a standard
originally created at Storyscript for building highly-portable “microservices” that expose the
events, actions, and APIs inside containerized software.
Getting Started
The oms command-line interface allows you to interact with Open Microservices. If you’re interested in creating an Open
Microservice the CLI also helps validate, test, and debug your oms.yml implementation!
Once you have the oms-cli installed, you can run any of the following commands from
within this project’s root directory:
Actions
lex
Action Arguments
Argument Name
Type
Required
Default
Description
files
map
true
None
No description provided.
oms run lex \
    -a files='*****'
parse
Action Arguments
Argument Name
Type
Required
Default
Description
files
map
true
None
No description provided.
oms run parse \
    -a files='*****'
compile
Action Arguments
Argument Name
Type
Required
Default
Description
files
map
true
None
No description provided.
oms run compile \
    -a files='*****'
grammar
oms run grammar
version
oms run version
Contributing
All suggestions in how to improve the specification and this guide are very welcome. Feel free share your thoughts in the
Issue tracker, or even better, fork the repository to implement your own ideas and submit a pull request.
2.(Optional)enter app/src/main/cpp/static_lib directory,unzip v8_arm_arm64.zip,then copy arm64-v8a and armeabi-v7a subdirs to app/src/main/jniLibs directory(overwrite the old files);
3.open Android studio(version 3.1 is recommended),open and load this project;
4.run it and view the result.(you can edit Java and native code if you will)
depot_tools已经自带了GN工具(GYP从V8 6.5版本开始就不再使用。请使用GN代替)。V8的构建需要借助于GN。GN是一个元构建系统(meta build system of sorts),因为它为其他构建系统(比如ninja)生成构建文件(it generates build files for a number of other build systems)。也就是说,GYP和GN 并不是构建系统,V8使用的构建系统使用的是Ninja,而GN是用来生产Ninja构建文件的工具。
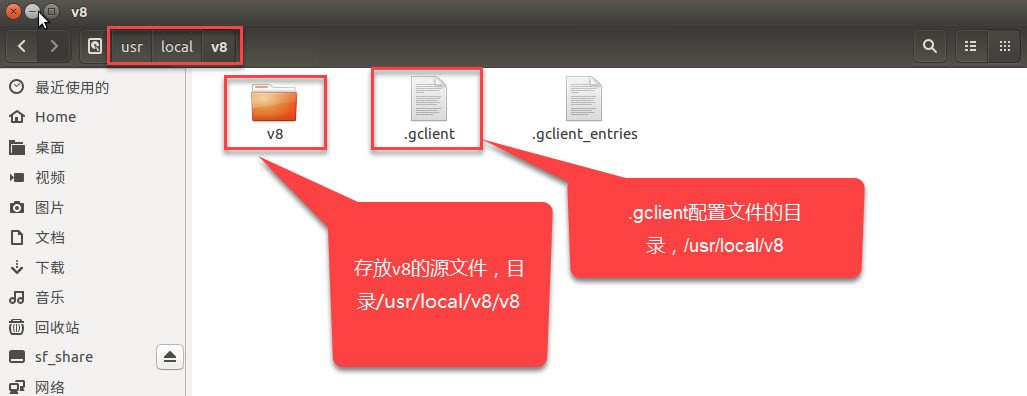
步骤1-4确保工具和v8的源码下载完成,在执行第5步前,再次确认当前工作目录已经在v8的源目录下(步骤4中的示例来看的话,就是/usr/local/v8/v8/)。然后在当前工作目录(比如/usr/local/v8/v8/)下执行如下命令,该命令将会下载所有的构建依赖项(Download all the build dependencies)
gclient sync
(这一步只在linux系统构建时才需要执行,且只需要执行一次–(only on linux, only needed once) 安装构建依赖项:
./build/install-build-deps.sh
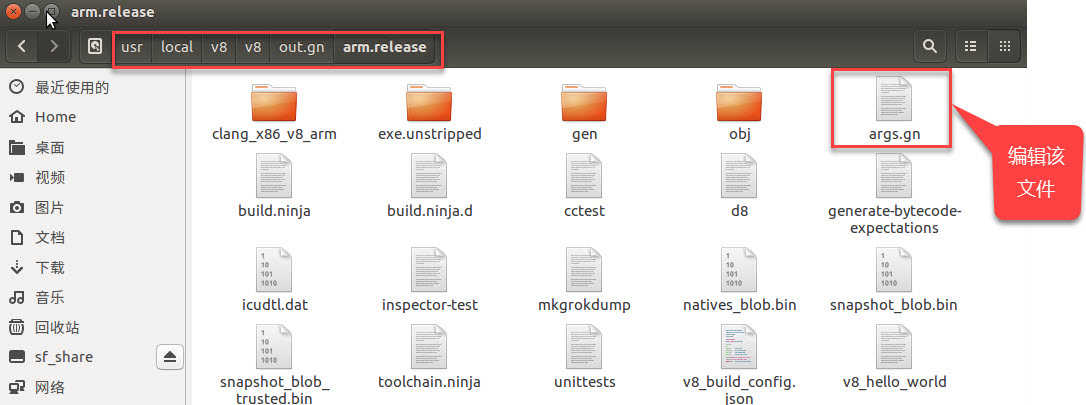
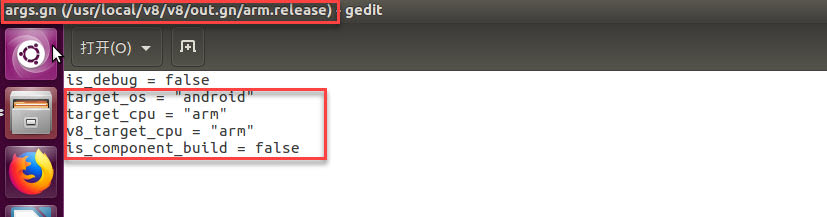
生成目标平台必需的构建文件(Generate the necessary build files by executing the following in your terminal/shell):
编译v8源码(Compile the source by executing the following in your terminal/shell):
ninja -C out.gn/x64.release
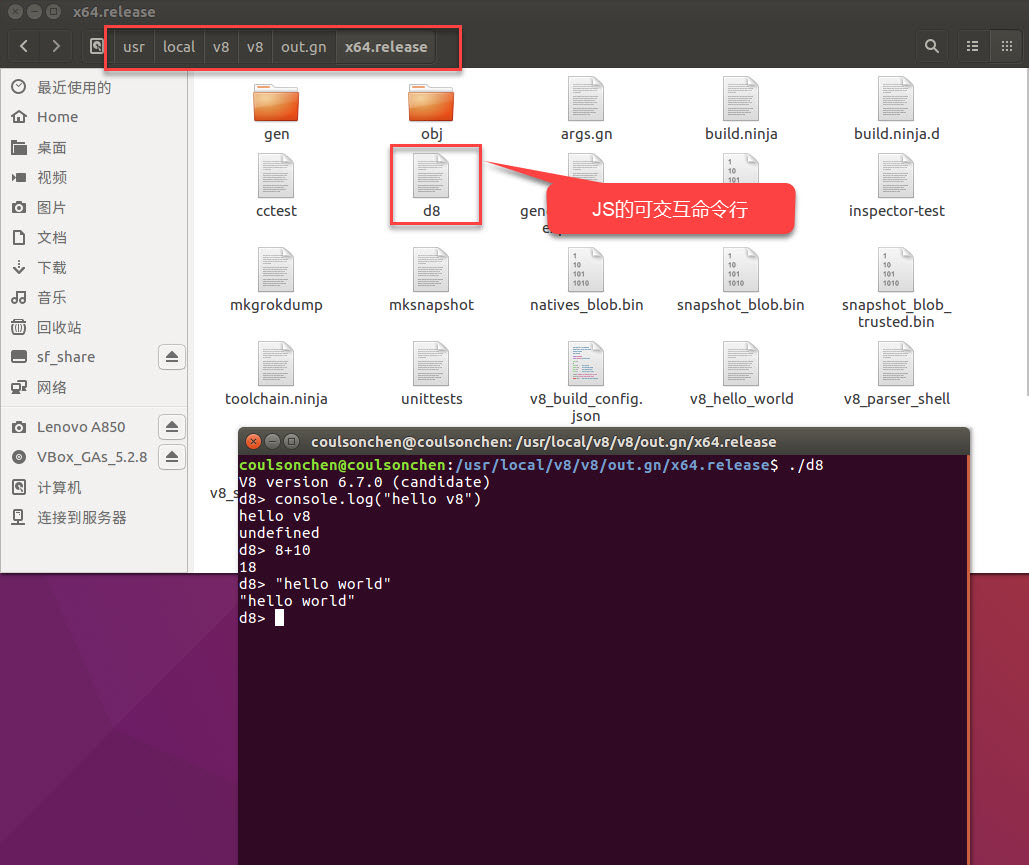
该命令是编译构建v8运行的所有文件(building all of V8 run (assuming gn generated to the x64.release folder))。编译完成之后,可以在/path/to/v8 Source dir/out.gn/x64.release目录(这里示例即/usr/local/v8/v8/out.gn/x64.release)及其子目录下查看构建产生的库和可执行文件。可进入该目录下,执行生成的d8可执行程序,进入javascript的交互命令行模式,示例如下图:
如果只需要编译构建指定的文件,比如d8(build specific targets like d8, add them to the command line)。则可执行如下命令(将要指定的构建文件添加到ninja命令的参数中):
ninja -C out.gn/x64.release d8
(可选,用于测试构建是否OK)执行测试(Run the tests by executing the following in your terminal/shell):
	// Create fat lib files.
	// You also could add all .* files into one single library.
	//
	cd out.gn/android_arm.release/obj
	mkdir libs
	cd libs
	// one lib to rule them all.
	ar -rcsD libv8_base.a ../v8_base/*.o
	ar -rcsD libv8_base.a ../v8_libbase/*.o
	ar -rcsD libv8_base.a ../v8_libsampler/*.o
	ar -rcsD libv8_base.a ../v8_libplatform/*.o
	ar -rcsD libv8_base.a ../src/inspector/inspector/*.o
	// preferred snapshot type: linked into binary.
	ar -rcsD libv8_snapshot.a ../v8_snapshot/*.o
	// depending on snapshot options, you should left out
	// v8_snapshot files and include any of these other libs.
	ar -rcsD libv8_nosnapshot.a ../v8_nosnapshot/*.o
	ar -rcsD libv8_external_snapshot.a ../v8_external_snapshot/*.o
	// source headers, for inspector compilation.
	mkdir -p src/base/platform
	cp -R ../../../../src/*.h ./src
	cp -R ../../../../src/base/*.h ./src/base
	cp -R ../../../../src/base/platform/*.h ./src/base/platform
	// copy v8 compilation header files:
	cp -R ../../../../include ./
	// For compilation on Android, always **use the same ndk** as
	// `gclient sync` downloaded.
	// As of the time of this writing it was `ndk r12b`
	// Enjoy v8 embedded in an Android app
关于libv8_snapshot.a/libv8_nosnapshot.a/libv8_external_snapshot.a在使用的时候任选其一,这三者的区别如下:
Currently, snapshots are compiled by default. These snapshots will contain base objects, like for example, Math. There’s no runtime difference among them, just different initialization times. In my nexus 5x, no snapshot takes around 400ms to initialize an Isolate and a Context, and around 30 with snapshot. The external snapshot and snapshot differ in that the external snapshot must be explicitly loaded (.bin files in the compilation output), and snapshot library is a static lib file of roughly 1Mb in size, that will be linked with the final .so file binary instead of externally loaded. Bear in mind that snapshot libs, internal or external, would require you to supply some extra native code for reading the Natives (.bin) files.
2.(Optional)enter app/src/main/cpp/static_lib directory,unzip v8_arm_arm64.zip,then copy arm64-v8a and armeabi-v7a subdirs to app/src/main/jniLibs directory(overwrite the old files);
3.open Android studio(version 3.1 is recommended),open and load this project;
4.run it and view the result.(you can edit Java and native code if you will)
depot_tools已经自带了GN工具(GYP从V8 6.5版本开始就不再使用。请使用GN代替)。V8的构建需要借助于GN。GN是一个元构建系统(meta build system of sorts),因为它为其他构建系统(比如ninja)生成构建文件(it generates build files for a number of other build systems)。也就是说,GYP和GN 并不是构建系统,V8使用的构建系统使用的是Ninja,而GN是用来生产Ninja构建文件的工具。
步骤1-4确保工具和v8的源码下载完成,在执行第5步前,再次确认当前工作目录已经在v8的源目录下(步骤4中的示例来看的话,就是/usr/local/v8/v8/)。然后在当前工作目录(比如/usr/local/v8/v8/)下执行如下命令,该命令将会下载所有的构建依赖项(Download all the build dependencies)
gclient sync
(这一步只在linux系统构建时才需要执行,且只需要执行一次–(only on linux, only needed once) 安装构建依赖项:
./build/install-build-deps.sh
生成目标平台必需的构建文件(Generate the necessary build files by executing the following in your terminal/shell):
编译v8源码(Compile the source by executing the following in your terminal/shell):
ninja -C out.gn/x64.release
该命令是编译构建v8运行的所有文件(building all of V8 run (assuming gn generated to the x64.release folder))。编译完成之后,可以在/path/to/v8 Source dir/out.gn/x64.release目录(这里示例即/usr/local/v8/v8/out.gn/x64.release)及其子目录下查看构建产生的库和可执行文件。可进入该目录下,执行生成的d8可执行程序,进入javascript的交互命令行模式,示例如下图:
如果只需要编译构建指定的文件,比如d8(build specific targets like d8, add them to the command line)。则可执行如下命令(将要指定的构建文件添加到ninja命令的参数中):
ninja -C out.gn/x64.release d8
(可选,用于测试构建是否OK)执行测试(Run the tests by executing the following in your terminal/shell):
	// Create fat lib files.
	// You also could add all .* files into one single library.
	//
	cd out.gn/android_arm.release/obj
	mkdir libs
	cd libs
	// one lib to rule them all.
	ar -rcsD libv8_base.a ../v8_base/*.o
	ar -rcsD libv8_base.a ../v8_libbase/*.o
	ar -rcsD libv8_base.a ../v8_libsampler/*.o
	ar -rcsD libv8_base.a ../v8_libplatform/*.o
	ar -rcsD libv8_base.a ../src/inspector/inspector/*.o
	// preferred snapshot type: linked into binary.
	ar -rcsD libv8_snapshot.a ../v8_snapshot/*.o
	// depending on snapshot options, you should left out
	// v8_snapshot files and include any of these other libs.
	ar -rcsD libv8_nosnapshot.a ../v8_nosnapshot/*.o
	ar -rcsD libv8_external_snapshot.a ../v8_external_snapshot/*.o
	// source headers, for inspector compilation.
	mkdir -p src/base/platform
	cp -R ../../../../src/*.h ./src
	cp -R ../../../../src/base/*.h ./src/base
	cp -R ../../../../src/base/platform/*.h ./src/base/platform
	// copy v8 compilation header files:
	cp -R ../../../../include ./
	// For compilation on Android, always **use the same ndk** as
	// `gclient sync` downloaded.
	// As of the time of this writing it was `ndk r12b`
	// Enjoy v8 embedded in an Android app
关于libv8_snapshot.a/libv8_nosnapshot.a/libv8_external_snapshot.a在使用的时候任选其一,这三者的区别如下:
Currently, snapshots are compiled by default. These snapshots will contain base objects, like for example, Math. There’s no runtime difference among them, just different initialization times. In my nexus 5x, no snapshot takes around 400ms to initialize an Isolate and a Context, and around 30 with snapshot. The external snapshot and snapshot differ in that the external snapshot must be explicitly loaded (.bin files in the compilation output), and snapshot library is a static lib file of roughly 1Mb in size, that will be linked with the final .so file binary instead of externally loaded. Bear in mind that snapshot libs, internal or external, would require you to supply some extra native code for reading the Natives (.bin) files.
each PR will get a individual custom URL automatically
Sponsoring
If you like this project and want to support us, we would be very happy to see you as a sponsor on GitHub ❤️
You can find the Sponsor button on the top right of the GitHub project page.
Thanks a lot for the support <3
dev
commands
cleanup
sudo rm -rf build dist .output .data
sudo rm -rf node_modules
initial setup
VM ID
Development VM ID from Thorsten for this project: 014
(Only interesting to him.)
system requirements for developing
The following softwares are required for development:
(The versions listed were the ones I most recently used for development and testing. So try sticking with them.)
{Ctrl}+{Shift}+{P} -> >Preferences: Open Settings (UI) -> search for keyboard.dispatch and set it to keyCode
Restart or reload VSCode.
Install recommended extensions/ plugins:
Open Extensions menu in VSCode ({Ctrl}+{Shift}+{X})
type in the search @recommended
install and enable the plugins
see file .vscode/extensions.json for configuring some of the extensions
Restart or reload VSCode.
In VSCode on the bottom left click your profile image and log in all services (GitHub due to VSCode extensions, …)
If the browser to VSCode callback fails, wait for the login popup on the bottom right to timeout (ca. 5 minutes) and
then on the upcoming popup question You have not yet finished authorizing [...] Would you like to try a different way? (local server) click Yes and use this alternative login mechanic.
(When you do not want to wait for the timeout to happen, you can also click the Cancel to trigger the dialog faster.)
Install dependencies: pnpm i
Happy coding <3
namings
we use build area and building area (not building lot nor building place).
lint and prettier
This project uses antfu/eslint-config for eslint most of the files.
The following extend it:
antfu/eslint-plugin-format for using external formatters like
e.g. prettier for the file types that eslint cannot handle.
This project uses the following icon collections in descending order, try sticking to them and use from top to bottom.
Tipp: Favorite them and use the search over all item collections at once: https://icon-sets.iconify.design/?list=favorite
full name
shorthand
license
note
phosphor
ph
MIT
Material Design Icons
mdi
Apache 2.0 (commercial use is allowed, no attribution required)
set Format to glTF Seperate (.gltf + .bin + textures)
set Remember Export Settings to true
under Data set Compression to true
under Compression set the compression level between 0-6 (0=less compression; 6=strongest compression)
I am using 6 most of the time – only when morphing between models, this should be set to 0.
TresJS & ThreeJS
possible import locations
Do not import from three directly but from the direct source instead. Example:
-import { MeshLambertMaterial } from 'three'+import { MeshLambertMaterial } from 'three/src/materials/MeshLambertMaterial.js'
Seems to work for types, but better use the direct import from the source folder (see above):
All *.gltf models, along with their corresponding *.bin and texture files, are located in /src/assets/models/.
To generate helper wrappers and type definitions, run:
pnpm run generate:gltf-models
This script scans all model files in the source folder, deconstructs the GLTF JSON representation, and places
the generated types in ./node_modules/.tmp/model-types/, ensuring only imported models are included in the
final product.
The script runs automatically:
always a .gltf file changes
before a dev run
before a build
after pnpm i
Nearly type safe GLTF file representations.
Importing models is type-safe, and builds will fail if a model is missing.
Only the used models are bundled in the final product.
On runtime: Runs useGLTF under the hood. So 100% correct objects and usage, no extra layer.
In dev: Scans the *.gltf file on its own, so the generated typing has redundant code and could be different
from what is present on runtime. So be careful when using and test/ double check it!
Example: In gltfModel.scenes.someScene.traversed.Object the typing only hints real objects and not each
primitive that is used to build up the objects. But in runtime these primitives are also present in the traversed.Object – but funnily enough not all … that is the reason I left away all primitives, just to be sure.
Multiple instances of the same model
For already loaded and parsed models the GLTF loader returns a cached version. So primitive uses then the same
model which means the single instance is unmounted and mounted again with other coordinates.
Example shadow configuration below.
The so generated shadows currently have heavy artifacts, so we bake the shadows in this project.
But here is an example configuration for shadows:
Normally, you could use the packages @tresjs/post-processing and postprocessing in combination for postprocessing
TresJS/ ThreeJS. Unfortunately, they are currently not compatible with TresJS core >v4, see comment on issue #16 and issue #32.
This project, including original code and models, is licensed under the Creative Commons Attribution-NonCommercial-ShareAlike 4.0 International License (CC BY-NC-SA 4.0). Under this license, others are allowed to remix, adapt, and build upon this work non-commercially, provided they credit the project founder and license any derivative works under the same terms.
Please note that this license applies only to the original content authored by the project’s creators. Third-party libraries, assets, 3D models, and other materials utilized in this project are listed under “Attribution/ Contribution” above and remain the property of their original creators, licensed under their respective terms.
The project founder reserves the right to modify the terms of this license or to offer different licensing arrangements for specific use cases.
For the full license text, please see the LICENSE file.
Need a Different License?
If you are interested in discussing a different licensing arrangement for individual use cases, please feel free to reach out. Custom licensing may be available, but it is not guaranteed.